How can BizTalk and RFID work together?

Radio Frequency Identification tags (RFID) are becoming widely adopted by business as a cost cutting tool. BizTalk Server is also widely adopted for its ability to integrate systems and by proxy cut costs. BizTalk is ideal for RFID solutions to transition the physical event to a digital process in an automated way. Let’s take a look at a real world example of how they can work together.

BizTalk interfaces with RFID in one of 2 ways:
  • At the moment an RFID tag is printed
  • At the moment an RFID tag is read

BizTalk initiates and correlates a print job

Let’s say you manufacture computers, and your computers are made to order. You want to make sure your customer gets the computer they actually ordered, so it’s important to identify it.

So your customer places an order on your B2B website. A BizTalk workflow is initiated that gathers up all the requirements for the order and passes it on to the ERP system for fulfillment. Once the ERP system shows the order fulfilled, BizTalk is then tasked with tagging the machine for delivery. BizTalk initiates the printing of the RFID tag and correlates it to that specific order; the printed sticker is attached to the new computer.

RFID and BizTalk initiate the delivery cycle

So the new computer is built, checked and packaged for delivery. A truck arrives at the loading dock, and a forklift places a load of orders on a palette and moves it to the loading bay. While in the process of loading the palette on the truck the passive RFID tags pass under an RFID reader.

This action is sensed by BizTalk because the RFID reader is attached to a BizTalk server which is ‘subscribed’ for listening to messages from that reader and kicks off an advanced shipping notice message to the client. At the same time, BizTalk checks to make sure that the RFID reader’s location matches the truck in that location to make sure the correct truck is delivering the order. The advanced shipping notice is received by the customer to notify them their order is on its way, and the invoicing process begins.


Uh oh, one year later, computer breaks

So your company has a great warranty plan and unfortunately something went wrong with that computer that was purchased a year ago. How can RFID be of help?

Well, your call center logs a call and BizTalk receives a message that this computer (with a known RFID tag) will be sent to the service center to be repaired. Eventually it will arrive and when it does, the RFID reader at the shipping dock will recognize the tag and notify BizTalk of its arrival. BizTalk updates the call center’s call with this status. The customer can now know the computer arrived for repair.

A technician is assigned to the repair, and BizTalk passed the details of this computer to that technicians work queue.

BizTalk waits for the repair to take place and notifies the call center when it’s complete. The computer is working again and needs to be sent back to the client.

The RFID tagged computer goes under an RFID reader when it’s being loaded and same ‘workflow’ that happened when the computer was originally sent takes place with an advanced shipping notice and, since its under warranty, a 0$ invoice is created.

Automation

If you’ll notice, all the steps here took place with almost no human intervention. There was no person at the loading dock checking off shipments, nobody faxing invoices or shipping notices, and nobody needed to reconcile the shipments at the end of the day.

If it were just BizTalk being used, some level of automation would be present, but with the combination of BizTalk and RFID, it’s possible to automate it all and that is where using them together is such a cost saver: less human interaction means less man-hours and fewer mistakes.


Microsoft acquires Covast's B2B technology

Microsoft has acquired Covast's advanced B2B technology to make it available as part of upcoming BizTalk Server 2006 R3 release.

The acquisition is expected to merge into R3 as superset of pieces to BizTalk Server 2006 R2's EDI component.

R3 will retain the current R2 functionality but will be more tightly integrated with Covast's reporting capabilities and adapters. Covast's B2B expertise will be expected to add value in specific verticals such as automotive, energy, manufacturing. Let all your Covast clients know.

http://www.covast.com/news/press.asp?id=91

How To Expose the BTS ReceiveLocationName Property

There are some BizTalk properties that are not exposed in any property schemas from BTS 2006 R2. If your development project is such that you can add a new property schema or add a new BizTalk project then it is possible to access these properties from an orchestration. Because they are context properties they are not available for routing.

One such property is the ReceiveLocationName property. While the ReceivePortName property is available in the BTS namespace the ReceiveLocationName property is not. Therefore, this syntax from an example orchestration expression shape results in a compile time error:  strReceiveLocation = myMsg(BTS.ReceiveLocationName);

ReceiveLocationName Property

We can easily see the ReceiveLocationName property in messages that come into BizTalk. The question is how to get its value into an orchestration?


Code Example

As you probably know, property values are identified by the property target namespace and property name. We won't ultimately use the following code, but for demonstration purposes in a custom pipeline component we can assess a property value by coding something like this:

// Namespace of the property
//
string
sysNamespace = 
    "http://schemas.microsoft.com/BizTalk/2003/system-properties";
 
// Or instead of hard coding the namespace:
// Assuming the property namespace for ReceivePortName is the same
// for ReceiveLocationName:
//
BTS.ReceivePortName BTSPropReceivePortName = new BTS.ReceivePortName();
sysNamespace = BTSPropReceivePortName.Name.Namespace; 
 
// Assign the receive location name
//
string
receiveLocationName = 
    pInMsg.Context.Read("ReceiveLocationName", sysNamespace);

You can see from the last line of code from above, that to retrieve a message property requires nothing more than knowing the property name and the property target namespace.

Adding a Property Schema

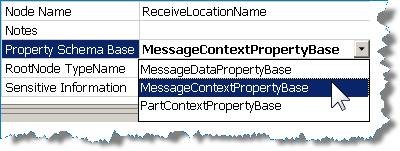
As far as BTS message properties go, they can be assigned Property Schema Base types of MessageDataPropertyBase (default) or MessageContextPropertyBase. MessageDataPropertyBase means that the XPath to the property value in the message must exist. A MessageContextPropertyBase property means that the XPath may or may not exist.

Taking this information into account we can expose the RecieveLocationName using the following steps. Note steps 1 – 4 are just suggestions.

1. Create a property schema, and perhaps create a new BizTalk project.

2. Add a new property schema. Let’s call it “schBTSExtra.xsd”.

3. Change the namespace of the .NET schema type to “BTSExtra”. This is just a shortened namespace similar to the “BTS” namespace in the Microsoft.BizTalk.GlobalPropertySchemas assembly.

4. Open the new schema if it is not already opened.

5. Change the name of Property1 (it was added by default when creating the new property schema) to ReceiveLocationName.

6. Set the Property Schema Base to MessageContextPropertyBase.

7. Highlight the “Schema” node and change the schema’s Target Namespace to
http://schemas.microsoft.com/BizTalk/2003/system-properties

8. Compile the project.

Property Schema Example

That’s all there is to it… now in your orchestration after referencing the new schema project (or you added this schema directly to your orchestration project) you can use an expression such as:

// Trace output from an orchestration expression shape
//
traceMsg = purchaseOrder(BTSExtra.ReceiveLocationName);
if
(traceMsg == null)
{
    traceMsg = "<null>";
}
System.Diagnostics.Trace.WriteLine("Receive Location Name: " + traceMsg);

Here is the result when testing my own orchestration:


External Links from MSDN

RecieveLocationName missing and a workaround

I've had the situation recently where I wanted to set up a receive port and have a large number of receive locations feeding into this port. In normal scenario this works fine but in my case it did not and had to find a workaround for it.

The reason the scenario above did not work is because I needed to know the receive location's name that the message came in on and the only property available from the context within an orchestration is BTS.ReceivePortName which is the same for all the locations.

I did some digging and for some alternatives, one was a custom pipeline which found and promoted the property "ReceiveLocationName", the second was a message context functoid on CodePlex which could retrieve this value from within a map. I didn't like either option and tried to widdle the code from the functoid into something I could use in a small helper class method or even the expression shape. I got the code to work but could never seem to find the ReceiveLocationName property I'd seen mentioned on other blogs. My guess is that it only appears with certain adapters but I couldn't even find it in any of the BizTalk schemas.

I decided to make a U-turn from this custom approach because I was just replacing a large number of receive ports with custom code. So instead of the custom approach I'd been working on I decided to make the initial receive shape in the orchestration direct bound and create 1-n ports which I could leverage in the orchestration without knowing the ReceiveLocationName.

Pipeline Component Property Promotion

I've often seen questions from new BizTalk developers asking why they couldn't subscribe to an incoming message. Typically, the question actually revolves around why were the message property values not promoted as expected? And sometimes, for the new developer, the answer is because he or she forgot to use the XML Receive pipeline component and instead used the Pass Thru Receive pipeline component for the message being received.

So, we take away from this scenario the fact that one job of a receive pipeline component (XML, Flat File, etc) is to promote property values from the message to the message context, which makes those values available to subscriptions. And notice the Pass Thru Receive pipeline is named appropriately... it passes a message through directly to the message box without any processing and since the message is not identified, even if it is an instance of a deployed schema, no properties from the message are promoted.

Custom Pipeline Property Promotion

Recently I was developing a custom pipeline component when I discovered that the message properties were not being promoted. Well, it was a little more complicated than that because this particular component encapsulated the Flat File Receive disassembly pipeline component. This part worked, because in this case the Flat File Receive component handled property promotion of the resulting Xml message.

The other piece of the puzzle was that I also created a second Xml message on the fly to be emitted from the pipeline. It was this second message whose properties were not promoted correctly or at all. To add another layer of complexity this additional message could be one of a handful of different types. I wanted to dynamically promote its properties since not having to adjust a custom pipeline due to schema changes in the future makes for a robust solution.

Drill Down into Property Promotion

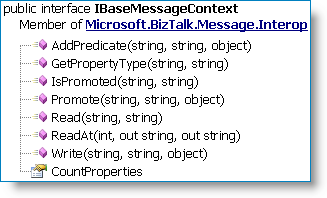
imageI realized that is up to my custom pipeline component to promote the properties for that second message since it is being created on the fly. If you've worked with custom pipeline component code before you'll think why not just use the IBaseMessageContext methods to promote properties? Well, that's the mechanism to actually affect the promotion but it is only part of the answer because those methods won't allow discovery of what field names are linked to the property schema(s).

Remember that when you create promoted properties for your message you are linking an XPath from your message to a property name (element) in a property schema. So not only do we need to discover what promoted (and distinguished) properties are available for this second message being created, we also need to know what the XPath is to actually promote the value from the message to the message context!

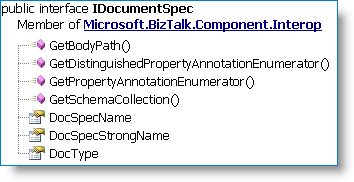
imageThis is where the IDocumentSpec interface comes in. This interface contains the GetPropertyAnnotationEnumerator and GetDistinguishedPropertyAnnotationEnumerator methods that will give us a list of both the promoted and distinguished property names. From this list we can also determine the XPath to those values in our message.

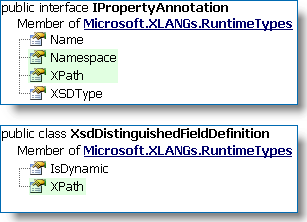
image In addition to the BizTalk references needed to compile a custom Pipeline Component, you will need an additional reference to Microsoft.XLANGs.RuntimeTypes.
This assembly contains the IPropertyAnnotation interface and XsdDistinguishedFieldDefinition definition. Ultimately it is these types of objects that are returned from the DocumentSpec "get" methods.

The "XPath" property contains the XPath to the value in the message which we will promote (or write) to the message context! The "Namespace" property contains the property schema namespace. As you'll see in the example below these values are used with the Promote() and Write() methods of the pipeline context.

Property Promotion Implementation

imageCreating a custom pipeline component is outside the scope of this post, though I've included some external links below. In our following example we retrieve the DocumentSpec object mentioned above from the pipeline context (IPipelineContext), which is provided to us during pipeline execution.
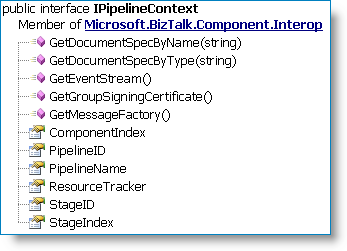
Since the documentation is not abundantly clear, I'll point out that the GetDocumentSpecByName() is passed the Strong Assembly Name (AssemblyQualifiedName property) of the schema type. The GetDocumentSpecByType() is passed the BizTalk MessageType (target namespace + "#" + root node name).

Once we have the DocumentSpec in hand then it's a relatively straightforward matter of stepping through the enumerated properties and promoting/writing them to the context of our message.

Code Snippet

// Instead of hard-coding namespaces for various built-in
// BTS properties, here is an idea that caches the information
// the first time the the pipeline component runs.
//

private
struct BTSProperties
{
    public static BTS.InterchangeID interchangeId = new BTS.InterchangeID();
    public static XMLNORM.DocumentSpecName documentSpecName = new XMLNORM.DocumentSpecName();
    public static FILE.ReceivedFileName receivedFileName = new FILE.ReceivedFileName();
    public static BTS.MessageType messageType = new BTS.MessageType();
    public static BTS.SchemaStrongName schemaStrongName = new BTS.SchemaStrongName();
}


[ ... ]

// msgAuditTrail
//     Second message created on the fly,
//     an instance of IBaseMessage.
//
// xmlMsgAuditTrail
//     Xml document instance.
//
// pContext
//     IPipelineContext - provided to us during
//     pipeline execution.
//
// auditTrailAssemblyQualifiedName
//     String value for the schema type.

IDocumentSpec
docSpecAuditTrail =
    pContext.GetDocumentSpecByName(auditTrailAssemblyQualifiedName);

// Write document type to the message context
//
msgAuditTrail.Context.Write(BTSProperties.documentSpecName.Name.Name,
    BTSProperties.documentSpecName.Name.Namespace,
    docSpecAuditTrail.DocSpecStrongName);
msgAuditTrail.Context.Write(BTSProperties.schemaStrongName.Name.Name,
    BTSProperties.schemaStrongName.Name.Namespace,
    docSpecAuditTrail.DocSpecStrongName);


// WRITE DISTINGUISHED VALUES
//
// Iterate through each distinguished property and promote it from the message.
// Write distinguished properties prior to promoted properties. This is because
// if a promoted property is also distinguished it won't be promoted if the
// "write" is used last.
//
IEnumerator annotations =
    docSpecAuditTrail.GetDistinguishedPropertyAnnotationEnumerator();

if
(annotations != null)
{
    while (annotations.MoveNext())
    {
        DictionaryEntry de = (DictionaryEntry)annotations.Current;

        XsdDistinguishedFieldDefinition distinguishedField =
            (XsdDistinguishedFieldDefinition)de.Value;

        // Use annotation.Name or Namespace to get the data to
        // promote from message
        //
        System.Xml.XmlNode contextNode =
            xmlMsgAuditTrail.SelectSingleNode(distinguishedField.XPath);

        if (contextNode != null)
        {
            // "Write" distinguished fields.
            //
           
msgAuditTrail.Context.Write(de.Key.ToString(),
                Microsoft.XLANGs.BaseTypes.Globals.DistinguishedFieldsNamespace,
                contextNode.InnerText);
        }
    }
}

// WRITE PROMOTED VALUES
//
// Iterate through each promoted property and promote it from the message.
// Write distinguished properties prior to promoted properties. This is because
// if a promoted property is also distinguished it won't be promoted if the
// "write" is used last.
//
annotations = docSpecAuditTrail.GetPropertyAnnotationEnumerator();

if
(annotations != null)
{
    while (annotations.MoveNext())
    {
        IPropertyAnnotation propAnnotation =
            (IPropertyAnnotation)annotations.Current;

        // Use annotation.Name or Namespace to get the data to
        // promote from message
        //
        System.Xml.XmlNode contextNode =
            xmlMsgAuditTrail.SelectSingleNode(propAnnotation.XPath);

        if (contextNode != null)
        {
            // "Promote" distinguished fields.
            //
            msgAuditTrail.Context.Promote(propAnnotation.Name,
                propAnnotation.Namespace,
                contextNode.InnerText);
        }
    }
}


External Links from MSDN

BizTalk Editor Global Types

Following on to the BizTalk Xml Complex Types post here are some tips for working with Complex or Global Types in the BizTalk Schema Editor itself.

Creating a Complex Type

The BizTalk Editor is very message-instance-centric and typically you are working with a schema that already represents a message in whole or in part. To create a complex type, highlight a record node and type in a Data Structure Type value. Typically I will use a suffix of "Type" as seen below.

image When you assign a value to the Data Structure Type property the BizTalk editor adds the "type" attribute to the element and also creates a definition for the type. This is important to note because if we delete the actual record node, the schema editor will look empty yet the Xml type we created still exists!  In fact, when saving such a schema a prompt will be displayed asking about deleting unused schema definitions.


In this case our Xml record has no children because it is a base type, but further below we'll look at a more complex example.:
image 

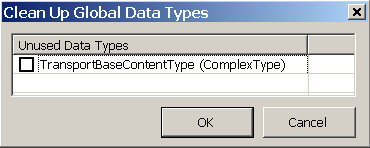
Saving a schema with unused data types results in a pop-up dialog being displayed:
image

Updating a Complex Type using the BizTalk Editor

Rename: To rename a global type, change the Data Structure Type property value. Caution should be applied if this global type is used in external schema definitions.

De-referencing: Let's say you've defined an Xml record as a global type but now you decide it'd be nice to copy all the elements from the global type but not reference it. This is easily done and is a nice feature of the BizTalk Xml Editor. Right-click on the Data Structure Type property and click "Reset" from the context menu. The property will now be empty and the fields from the global type will be copied to your record node as if you had typed them in. This tip works with other global definitions as well, such as Sequence Group references.

Deleting: Using the BizTalk Editor the only way to delete an unused Global Type is to remove its use from your schema and then save the schema. The type definition will then be deleted if you choose. See the above screen shot "Clean Up Global Data Types". You can also edit the XSD file manually or use the standard XML Schema Editor. 

Example

In our example BizTalk application we process many different kinds of flat file messages and the first two rows of all the messages contain the same format. So, we would like to create a reusable global definition.
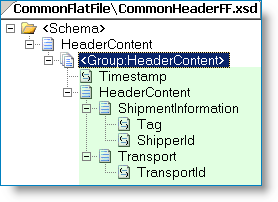
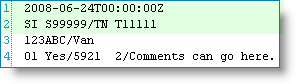
Row 1 contains a timestamp, and row 2 contains a "/" (slash) delimited record for Shipment ID and Transport Number.

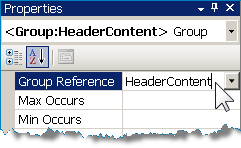
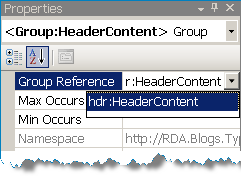
The first step (see next image) is to create a schema to hold the header flat file definition. You can use the Flat File Wizard if you want to help define the schema for the first two rows. Afterwards, create a Sequence Group to encapsulate the fields and flat file attributes -- which I can use since all of my fields are elements. To create the global definition just type in a name for your Group -- in this case I used the name "HeaderContent". Note; For our purposes this schema is not a "Flat File Header Schema" as in flat file envelope processing, which is a whole other topic.

image image


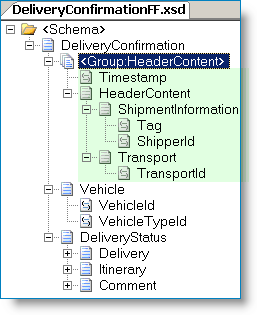
Next, create the document flat file schema and define everything except for the header content. The example below is for a fictional Delivery Confirmation document. Import the schema containing the reusable type and reference it in the document schema. Automatically the entire flat file header content that was previously defined is now part of Delivery Confirmation document.

image image


External links from MSDN

BizTalk Xml Complex Types

BizTalk operations are often designed to use an internal message representation, a canonical, for disparate data that represents the same logical piece of information. For example different trading partners might submit different Purchase Order formats, which are then transformed into Purchase Order canonical messages so that BizTalk services can process them consistently.

Sometimes there are other reasons for using a canonical such as the need to enrich the data (status, approvals, context metadata, etc) or to transform the message from non-Xml flat text data.

I recently worked on a project that involved processing many different types of messages. The schemas involved were anything from simple free text messages to well defined messages with both organized content and free form text. While the messages where physically different they all had a common business context. If there had been only a few different messages then a direct schema implementation might have been indicated, however we had almost 100 different message types and different services might subscribe to one or more of them. So, we needed a single canonical to easily represent any one of these different messages. This would also make the subscription/filter configuration easier to maintain and deploy.

How did we implement a single canonical schema to easily represent one of many different messages? The first idea was to try to normalize all the different fields in all the different messages and add the fields to the canonical. This works but the downside is that every time a message type is added or changed, the canonical would have to be updated. Another downside is that structurally it is difficult to organize the canonical schema to make sense from a business perspective and one looses the ability to eyeball the schema and understand where the data is coming from and how it is grouped.

We implemented our solution using Xml Complex Types and the resulting canonical schema required no updating if a message type was added or changed. First we created a base message content complex type from which all other content would be derived. Next we reviewed all the messages and decided how they might be organized from a business perspective. Next, we created the individual content by extending the base message type. Lastly, instead of adding individual messages to the canonical, we simply added the base message content complex type.

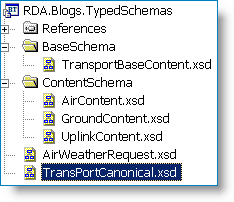
The screen shots below depict a schema for a fictional shipping company. Note; the project artifacts are simplified for discussion purposes.

image001

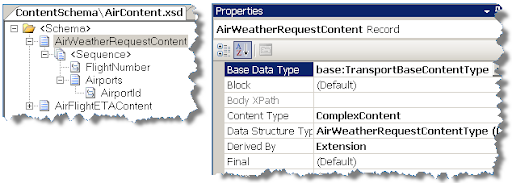
The screenshot below shows the Air Content schema, which contains all the content types associated with shipping by air.

image002

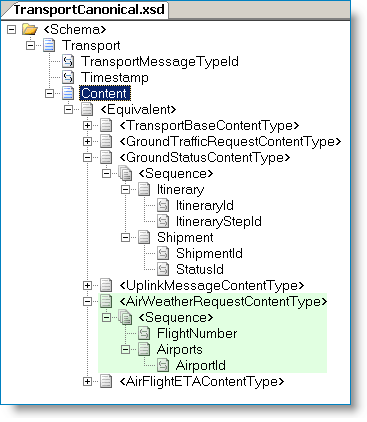
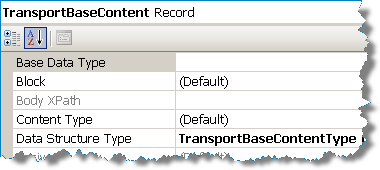
The Transport Canonical schema is shown below. The “Content” node is assigned the base content type. Since all the individual Ground, Air and Uplink content types are derived from the base type they are automatically part of the canonical schema. Note the Xml equivalent node; it contains all of the derived message types from the base Xml complex data type. From MSDN;

“Equivalent nodes are created automatically by BizTalk Editor to show how derived complex types can be used instead of the base complex type from which they are derived wherever the base complex type is called for in the schema. This yields the same type of polymorphism that is common in many object-oriented programming languages.”

image003

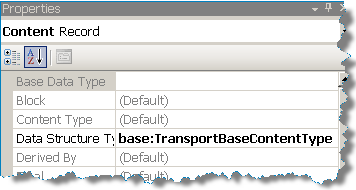
The “Content” record properties.

image004


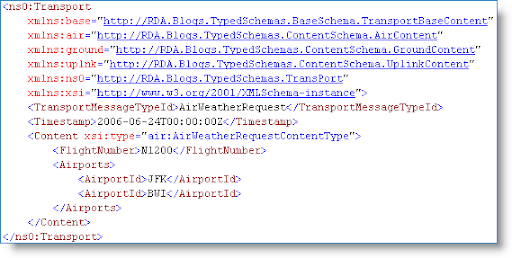
Below is a screenshot of a canonical instance for the Air Weather Request message. During mapping we could easily map the name of the message to a promoted property (TransportMessageTypeId) if required.

image005

BRE and XML Node Creation

On a recent project, I was tasked with using Business Rules Engine (BRE) to call a list of BRE Policies. These policies could generate a number of results, or triggers, the number of results was not known until runtime. BRE can update existing XML nodes within the Fact document, however, it cannot create nodes that do not already exist.

To solve this issue, I decided to add a serializable .NET object to pass in as a fact. The object has a public method that is used to create trigger objects and add them to the object's collection. Upon return from the BRE call, the raw xml of the object is exposed through it's XmlString property.

First we will talk about the Trigger class. This class represents our result. It is very generic and thus flexible in its use. The TimeStamp field can be used to track the time the trigger was created. We use the InterfaceName field for routing purposes. The Action and SubAction fields can optionally be used to further differentiate the trigger from other triggers during routing. The other section of the Trigger is a collection of Parameters. This is where a list of key-value pairs can be stored for use in processing. We expose a method to add a parameter key-value to the Parameters collection.


The PolicyResults class is a collection of Trigger objects. We expose a CreateTrigger method in order to be able to create Trigger objects on-the-fly from BRE. We also expose two utility properties, Count and XmlString. The Count property returns the number of Trigger objects in the collection. The XmlString property returns the raw XML version of the collection. This property can be loaded into an XmlDocument class and assigned to and XLang message easily.


We use this setup when calling BRE by first creating a PolicyResults object and passing it into BRE as a fact. Next, when creating policies in BRE, we can call the CreateTrigger method in the Assert section of any Rules we create. If the Assert is executed the Trigger(s) will be created and added to our PolicyResults. Once the BRE call is complete we can return the PolicyResults as a string (or XmlDocument) to the calling orchestration, where can be used for processing.

R2-AS2 POC

R2 AS2 POC
Sometime back, I worked on a AS2 POC(proof of concept) using BizTalk 2006 R2. Here is a high level overview of VAN/BizTalk interaction, Party configuration, AS2 and EDI receive/send ports configuration in R2, to generate decrypted EDI files and 997s.


BizTalk Server 2006 R2 makes use of many components to successfully establish communication between VAN(Value Added Network) provider and their customers. In this proof of concept, to receive and send EDI messages, AS2(Applicability Statement 2) components and HTTP adapter components are primarily used.
BizTalk AS2 receive processing is performed using the AS2 receive pipelines. There are two types of AS2 pipelines available in R2. AS2EdiReceive pipeline to process EDI messages received over AS2 and AS2Receive pipeline to process messages that are not encoded in EDI. AS2 pipelines are also responsible for generating MDNs(Message Disposition Notification).
In the above diagram, a request-response HTTP Two-Way adapter is configured to receive messages from VAN. AS2 receive pipeline generates the MDN and routes it to the BizTalk MessageBox database. This MDN will be automatically picked up by the AS2Send pipeline which is part of the HTTP Two-Way adapter. AS2 receive pipeline uses the BizTalk S/MIME pipeline component to provide S/MIME decoding functionality. AS2 Decoder processes the incoming message AS2/HTTP headers, verifies the signature and decrypts the encrypted messages. After successful decryption, AS2 disassembler generates a MDN and sets the correlation tokens and properties on the MDN.
In the case of EDI messages, EDI disassembler will parse the message and generates corresponding EDI document and 997 acknowledgements.

Party Configuration:

  • Create a new party using the BizTalk Administrator explorer
  • Enter appropriate values in the Organization, Name and Value fields under the values. I used EDIINT-AS2, AS2-From and partner name respectively. Hint: AS2 functionality resolves the incoming messages party information based on the AS2-From and AS2-To values in the Aliases tab
  • Next step is to set signing and encryption, MDN generation request properties for a given message
  • Right click on the party to select AS2 properties, select Party as AS2 message receiver
    Leave the default values selected and make sure Sign message and Encrypt message check boxes are selected under Outbound AS2 message. I selected DES3, Application/EDI-X12 and also entered AS2-From and As2-To values, selected ‘Request MDN’ check box

HTTP Two-Way port configuration:

  • Create a Request-Response receive port/location to process AS2 messages and generate MDN response
  • Select HTTP as transport type and select AS2EDIReceive as receive pipeline and AS2Send as send pipeline
  • Create a send port to send raw data and go back to the party you created earlier to select this send port using the party administration
  • Select Certificate in the send port to apply certificate thumbprint for encrypting messages
  • Create another send port to send pay load messages (EDI messages). In this case, selected file transport type to send EDI files to local folder and make sure to set EDISend as the send pipeline
  • Enter receive port name and select EDIintAS.IsAS2PayloadMessage == True in the send port filter. This fileter values allows us to decrypt EDI messages and creates message files as specified in the Transport Type

997 Configuration:

Certificate Management:
It turned out the most important part of the POC was to have valid certificates and configured it right. I obtained a trial certificate from VeriSign. Note, you can also use windows generated certificate too. In a nut shell, for the encryption/decryption of the messages over AS2, I followed the Certificate configuration as described in this KB article: http://support.microsoft.com/?id=942253

Using BAM API’s in a BizTalk Solution

Recently, I had a requirement where I needed to track a subset of messages flowing through an ESB to capture and store key data points to a table along with the raw Xml of the message. The data was going to be used by the client for viewing and reporting.

After a couple of small POC’s, it was decided to leverage BAM API’s in order to persist the data. BAM comes with OOB functionality to capture and display data elements through the BAM portal. Additionally, after defining an Observation Model using the Excel plug-in, the BAM definition is then deployed which creates Sql Server tables, stored procedures and views in order to persist and update the tables.

But, OOB functionality does not support capturing and persisting of the underlying Xml or provide content based filtering, so as part of the POC, the BAM API’s were used to store the Xml.

A C# component was written to use the OrchestrationEventStream class from the BAM API. This class is designed to asynchronously write data into the BAMPrimaryImport database as well as provide transactional consistency when used from either an orchestration or pipeline.

For this particular solution that I was working on, the messages that needed to be tracked were already being consumed by a generic Data Archive orchestration. This orchestration was then modified to contain a Decision Shape that would filter based on configurable conditions to capture the required content.